Create Expense Report

Create Expense Report

Expense reports are the one or more expense lines, create a expense report and submit it for an approval to a manager.

  1. Log in and access Expense Reports App from universal navigation menu bar
  2. Click on “Create” button and select “New Expense Report”.
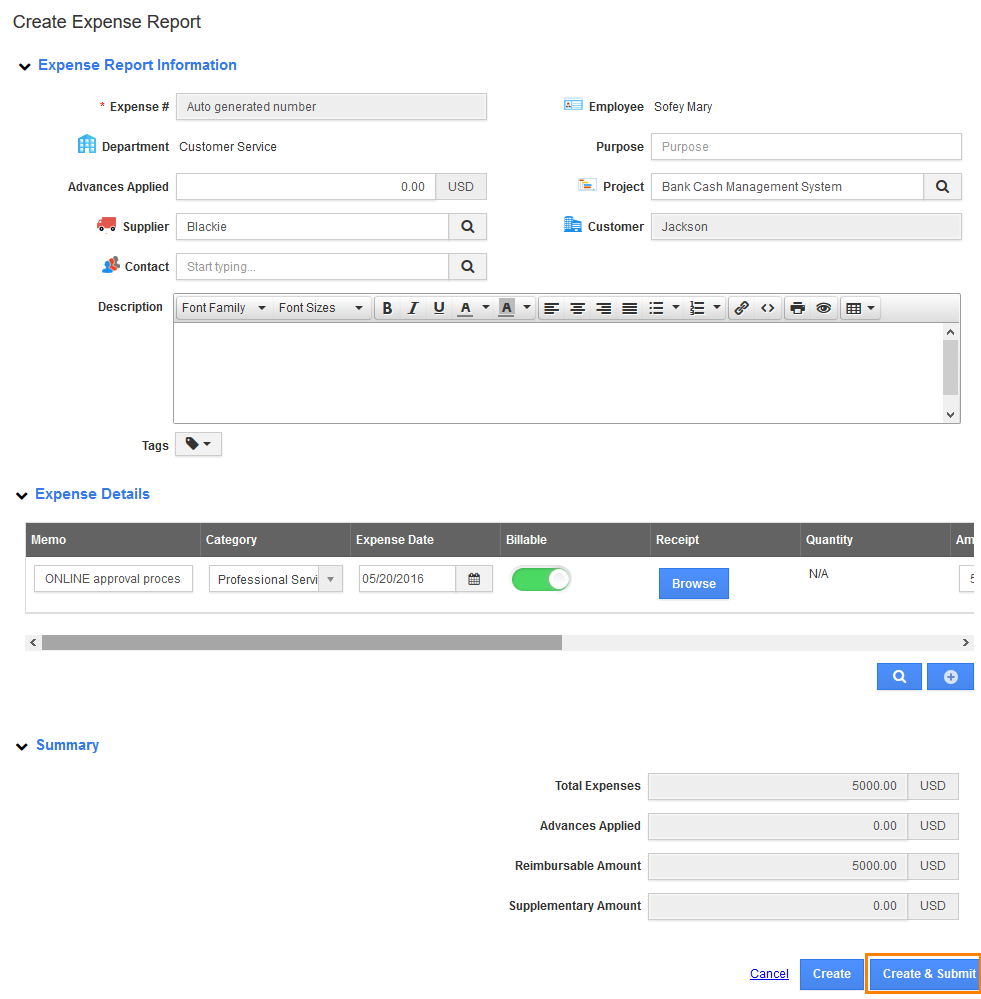
  3. You will view creation page at the right side, Note: Following are the fields on this page are the same as the fields on the Create (or Edit) Expense Report Page.
    • Expense Information
      • Expense # – This is an autogenerated number, you can also manually key in the value by configuring the setting.
      • Employee – The logged in employee name will be auto populated
      • Department – This field will be auto populated with the value from employee record and other basic information like supplier name, customer name, contact name, description, etc,.
    • Expense Details
      • Memo – Enter the high level information regarding expenses
      • Category – Select the value from drop down to define the expense
      • Expense Date – Enter the date for any added line items
      • Billable – Enable the toggle to indicate the expense line is billable
      • Receipt – Browse the image from your system to upload the receipt
      • Amount – Enter the amount for any added line items
      • Conversion Rate – This field will be auto filled based on the multi currency dropdown
      • Actual Amount – Displays the total amount This field will be calculated from amount and conversion rate
      • Actions – Delete the expense line or Adding note regarding the expense line
  4. Summary – Total amounts for an expense report and any accommodation charges added in expense lines.
  5. Click on “Create & Submit” blue button.Expense report
  • >   Create Expense Report

    User Manual >> Documentation >> Expense Reports App >> Expense Reports Basic Features >> Create Expense Report

    Create Expense Report

    Create Expense Report

    Expense reports are the one or more expense lines, create a expense report and submit it for an approval to a manager.

    1. Log in and access Expense Reports App from universal navigation menu bar
    2. Click on “Create” button and select “New Expense Report”.
    3. You will view creation page at the right side, Note: Following are the fields on this page are the same as the fields on the Create (or Edit) Expense Report Page.
      • Expense Information
        • Expense # – This is an autogenerated number, you can also manually key in the value by configuring the setting.
        • Employee – The logged in employee name will be auto populated
        • Department – This field will be auto populated with the value from employee record and other basic information like supplier name, customer name, contact name, description, etc,.
      • Expense Details
        • Memo – Enter the high level information regarding expenses
        • Category – Select the value from drop down to define the expense
        • Expense Date – Enter the date for any added line items
        • Billable – Enable the toggle to indicate the expense line is billable
        • Receipt – Browse the image from your system to upload the receipt
        • Amount – Enter the amount for any added line items
        • Conversion Rate – This field will be auto filled based on the multi currency dropdown
        • Actual Amount – Displays the total amount This field will be calculated from amount and conversion rate
        • Actions – Delete the expense line or Adding note regarding the expense line
  • Summary – Total amounts for an expense report and any accommodation charges added in expense lines.
  • Click on “Create & Submit” blue button.Expense report